Featuring colorist Ronda Francis

Showing posts with label kidlit. Show all posts

Tuesday, January 4, 2022

COVER REVEAL

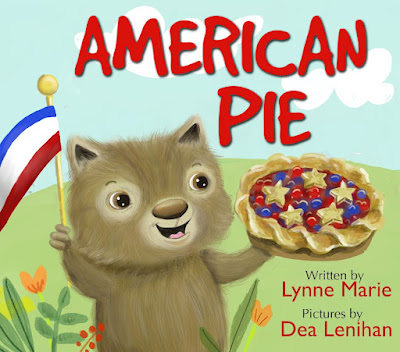
 I am happy to announce the cover reveal of AMERICAN PIE, a book by Lynne Marie that I illustrated.


Watson the wombat can't wait to celebrate his first 4th of July in the USA, but can one wombat make a parade, a picnic, or apple pie? With no apples? Watson's quest for apples brings everything he wanted and more in this sweet celebration of American and friendships.

You can preorder this fun-filled book HERE, for the April 14 release.

xo

Saturday, October 15, 2016

A Colored Pic from PENELOPE'S GARDEN

Here is an imaged from my book PENELOPE'S GARDEN that was colored by Ronda Francis. I just love it.

CLICK HERE and purchase before price increase!

Looking forward to more images colored by YOU.

xo


Drawn by me, colored by Ronda--LOVE. xo

Buy PENELOPE'S GARDEN HERE


Friday, October 7, 2016

What is YOUR Coloring Personality?

This personality list was created by me for fun. I have NO credentials for creating personality tests, but I have been told it is accurate. 

Let's see if it is true for you too.

The Perfectionist: Everything you color is beautiful, but you are never happy with it. You like iced tea, coffee, or anything with caffeine. You may have every type of eraser known to man, but none of them work well enough for you. You love organizers and date books but never use them.

The Lone Ranger: You like to close out the world when you color. You may have a whole area or even a room dedicated just to coloring. Your taste in music ranges from a little bit country to a little bit rock and roll. You love scented candles.

The Over Indulger:  You might not stop for your cup of Starbucks, but it is very hard for you to pass up a great new coloring book, or pencil, or gel pen. You'll color in your pajamas, with the kids, alone, or with kitty on your lap. You are a bit afraid of spiders and kind of like it when you get the hiccups.

The Little at a Timer:  You think about coloring a LOT, but many times your find yourself finishing one leaf, a flower, or even just an outline. But that does not bother you a bit! It takes you a while to finish but the results are worth it. You like fuzzy slippers and a robe and would love a visit to the spa.

The Stalker:  You watch some of the coloring groups from afar but have never posted. You admire many of the pictures and feel a bit nervous about posting yourself. If you look carefully at your pictures you'll see you prefer cool colors with a pop of warmth. You love the holidays and always look forward to dessert.

The Picture Jumper: You have plenty of books, and you have started many pictures, but you have only finished a few. You are very excited to start, but soon see something new and can't wait to start on it, leaving your other picture half done. You love cookies and can't understand what all the fuss is about yoga. 

The Old Schooler:  You started coloring WAY before coloring was cool. You had the 64 color Crayola set of crayons when you were a kid, and possibly the scented markers. You may have even colored on Saturday mornings as you watched cartoons. You are addicted to pizza and wish it tasted like it did in the 70s.

The Librarian:  You may have dozens of books or only a few, but the ones you have are placed carefully on shelf or stacked where they are easy to view and accessible. You won't rip the pages out of the books to color even if it is much easier to color that way. You love cinnamon and have taken pictures of clouds or seashells.

The Combo: You are little bit of everything--or maybe none of the above! You can't be put into any of the above categories, and you might have a great love for animals and watching movies.

So tell me what category (or two) YOU fall into. 

Have fun! xo Dea

Buy my new best selling Halloween coloring book HERE.


Or and older one HERE.


Wednesday, September 14, 2016

Coloring with Polychromos vs. Conte Pastel Pencils

Here is a video where I color one tomato with Faber Castell Polychromos pencils and one tomato with Conte pastel pencils.

I originally thought I would just do it for myself--then I figured, why not share!

Nothing fancy and far from perfect coloring technique--just a quickly. 

Interesting results!

xo


Friday, August 5, 2016

Drawing vs. Writing--Which One is YOUR Thing?

As an author and artist I spend much of my day either imagining then sketching images, or thinking about a story and then writing it down before it fades into the ether.

Someone asked me recently which I prefer to do, and initially I was a bit befuddled. I've been doing both since I was a young child (like most authors and artists) and had to really think.


But I have an answer.

If I had to do ONLY one for the rest of my life, I would have to choose writing. 

My posts and pages on Facebook and my blog are filled with my art, but I get a more fulfilling buzz from words. The images are great attention getters, and I am happy to share them.

I find drawing satisfying, especially when the picture is done. I can hold a conversation while I draw, and funny enough even watch TV (something I rarely do anyway). But there is something missing.

When I write I am almost completely absorbed. Time flies, and I get the feeling I am a bit lost, which I love. I get to create worlds and people, and it feels like a special privilege. It is magic.

My stories are almost never exactly right on first draft, and I even like the rewrite part--it feels like a puzzle, and each fix feels like another reward.

I usually have ideas to go with the stories--what the people look like, the settings, and I am happy to sketch them out, but once that part is finished there is a pull, and it is usually another story clawing its way to the surface.

Creepy Carrots--I am in love with the illustrations by Peter Brown. Peter, if you are reading, boy do I have a book for you!
 It would be a wonderful thing to write a story and have a fantastic artist flesh it out and make it a thing of beauty. I recently did some sketches of one of my characters and a wonderful artist did them in digital, and I was amazed. I have every digital do-dad there is, but I can't recreate what she did.

That is not to say that I will never write a book and illustrate it myself, but from now on I will really think it over, and if my art fits, then it's off to the races, but if I think someone else could elevate my books and stories even more, then I will gratefully turn it over to another more suited talent, and anxiously wait for the stunning results.

We can't be and do everything--we have to pick OUR thing and run with it. Get better at it, then eventually get great.

This realization was freedom to me, and I have renewed energy about my work that I haven't had for some time.

Disney had it right when Elsa sang Let It Go.

xo


Wednesday, November 25, 2015

Downloadable Turkeys!

Happy Thanksgiving to you all!

Since I won't be eating any turkey tomorrow I drew some that you can download and color--one for the big kids (and adults, let's be real) and one for the little ones.

For the little ones


For the older set, and adults.

Have a wonderful day!

xo

Monday, November 23, 2015

Kid Art, Creativity, and How-To Kitty

Pablo Picasso said, "We are all born artists. The problem is how to remain an artist once we grow up."

So true!

Children gain self-esteem and emotional fulfillment when they are allowed to create without judgement. 

They do not have preconceived notions or endless loops of internal negativity to get in the way of their thinking. 

If we foster the creativity in a child we are allowing them to develop critical thinking and problem-solving skills. The Whole Child of PBS states: "The experiences a child has during their first years of life can enhance their creativity."

For all those parents out there that want to do art with their kids but think I do not have a creative bone in my body--maybe you do, but need a little help finding it. 

Make it easy. Get some paper and some pencils, crayons, or paint and go for it. Don't worry about the result. Enjoy the moment and  just go for it.

For those that need a bit of a nudge, here are some prompts:

* A lovely November morning
* A yellow bird
* A cup of tea
* A monster in the closet
* A rocket ship in space
* A new planet
* A flower no one has ever seen before
* Constellations in the night sky 
* Your pet
* A pet you wish you could have
* A cool car
* Snow flakes with faces

Choose any of these items and draw one on a page, a few, or 50. Just have fun.

And here is a quick how-to for Kiki the Cat :) Show me your version when you are done!

xo

Kiki starts with two circles, kind of like a snowman, except the bigger one is for her head! (Only slightly bigger--mine almost look the same size and that is fine.) Draw lightly here because you will be erasing some of these lines later.

Now draw some VERY light guidelines on her face so you know where to put her eyes and nose.

Her face is looking right at us, so her nose will be right in the center, on the lower guideline.
Make the nose with just a tiny triangle, and then draw another short time down from the bottom point of her nose. Then draw the top of her mouth--it looks like two very shallow Us. Her eyes fit between the top and bottom guidelines. My Kiki will be looking to the right. (Her head is facing forward, but her eyes are looking off to the side.)

Lightly draw two triangles on her head for ears. If you draw them wide apart she will look calm, if you draw them more on top of her head she will look alert, or surprised. 

Her front paws are just small ovals with the tops of the ovals erased. Her back paws are kind of like parenthesis with tiny cat toes. Her tail looks a bit like a large backwards C.

She's starting to look like Kiki now!


Now we can darken the lines and make her look fluffy. I also left some white spots in her eyes for highlights, and lines under her for a shadow. I also added some very light whiskers and I shaded part of her ears.

Voila! Kiki!

I will be adding more Kiki how-tos in the weeks to come.

I'd love to see what you draw!


Wednesday, September 23, 2015

KIDS! How to Draw a Slightly Sophisticated Pumpkin for Fall

When I was in third grade I did not like my art teacher but he taught me one thing I will never forget--how to make a pumpkin look like it has dimension.

 That started a whole 3D thing for me--block lettering, perspective--but that is for another post. Back to the pumpkin. 

Like the title of the post says, this pumpkin is a bit more complicated than a cut-out orange circle and black triangle eyes. It shows dimension, color blending, shading, and highlighting. It takes a bit of time, but the results are worth it, especially for kids who like a challenge.


First, lightly draw an oval--any kind will do. Draw lightly at first because you may want to erase the guidelines later. Mine is a bit wide. 

Then draw a slightly crooked rectangle (technically a rhombus) for a stem . 

Starting at the bottom edges of the little rectangle, draw big curved lines to the bottom of the oval, keeping them a bit apart like this. 

As the lines get close to the edge, curve them to the side of the drawing. And then curve them toward the back, like in picture three.

You should see a bit of dimension now.

To make the stem look 3D add a small oval on top to indicate where it was cut. Many times the cut is not perfect so go around the small over and make jagged lines. Then curve the sides of the rectangle in slightly.

Now connect the curved lines at the bottom and the top, and also around the stem to indicate the shape of the pumpkin. Keep these lines pretty close to the original lines, if they are too curved the pumpkin looks fluffy.

These lines makes it more like a pumpkin and less like an oval.


It should look pretty pumkinish by now.

Then erase the original lines.


Notice the curved lines under the stem also. This also adds shape to the pumpkin and makes it seem plump and round.

To color use any paint you like, markers, or colored pencils.


I'm using colored pencils in several shades of yellow, orange, brown, ocher (a brownish-yellow, great for fall), and russet, (kind of reddish-brown). These are Polychromos by Faber-Castell. I LOVE these pencils, BTW. BUY HERE


First color with the yellows. Use the lighter shades first. Then move to light orange.
When shading use slightly darker colors in the creases and lines, and leave an area lighter if you like to show where the sun hits it. The darkest areas will be behind stem, at the bottom, and in the creases on the pumpkin and around the stem 


Light brown can be used to show shadow around the stem, at the bottom, and in the creases. Don't worry, the pumpkin is not perfect. Wavy lines or mistakes can sometimes add to the charm.


Use ocher, russet, and even some greens in the stem. Notice the lines in the stem that add depth and make it look a bit cracked. Some green can also be used in the pumpkin itself.


If you'd like to make your pumpkin into a Jack o'lantern, with a black pencil draw two triangles to indicate eyes. A triangle for the nose draw and a nice wide smiling mouth. You can even add a few teeth.

To add even more dimension, sketch in lines in the triangles on the left side to show depth. It's almost like you can see the inside of the pumpkin. Do the same of the curved side of the mouth and sides of teeth.


Or you can leave it just as you found it in the patch.

Voila! A pretty realistic pumpkin!

Now you can draw a few more--make them tall, or round, or even in different colors. Here is one done by a boy who followed the directions. It looks great, and very different than mine.


Show me what you make and how you decorate with your pictures.

xo 


Wednesday, June 24, 2015

Journaling

During a conversation with a friend yesterday I realized I should be journaling.

The conversation was slightly serendipitous to begin with, she bringing up a topic I was just having issues with. 

Then she asked if I wrote in a journal every day. 

I told her I used to, and as a matter of fact, journaling was one of the reasons I began to write again.

I could not give her a good reason why I stopped, other than things seemed to start moving in the right direction.

I remember thinking back when I was writing in a journal every morning that doing it was better than therapy.

*  I realized how much I longed to write.

*  I realized how much I longed to draw.

*  Most importantly, I realized I was the only thing stopping me from doing either.

So to make a long post short, I'm journaling again. Twenty minutes, once a day.

We'll see where it takes me this time.

xo


(The book that inspired my first round of journaling: Click here to check it out.